## 内容概要 1. 路由分发 2. 名称空间 3. 虚拟环境 4. 视图层必会三板斧 5. 视图层JsonResponse对象 6. 视图层request对象获取文件 7. 视图层FBV与CBV 8. CBV源码剖析 # 内容详细 ## 路由发分发 django支持每个应用都有自己独立的`路由层`,`静态文件`,`模板层`,`视图层(默认)`,`模型层(默认)`基于该特性多人开发项目就可以完全解耦合,之后利用路由分发还可以整合到一起 多个应用都有很多路由与视图函数的对应关系 这个时候可以拆分到各自的路由层中 基本使用 1. 使用路由分发之前 总路由直接干了路由与视图函数的匹配 ```python path('index',views.index_func) ``` 2. 使用路由分发之后 总路由只按照应用名分配匹配方向 ```python path('user',include('user.urls')) path('home',include('home.urls')) ``` 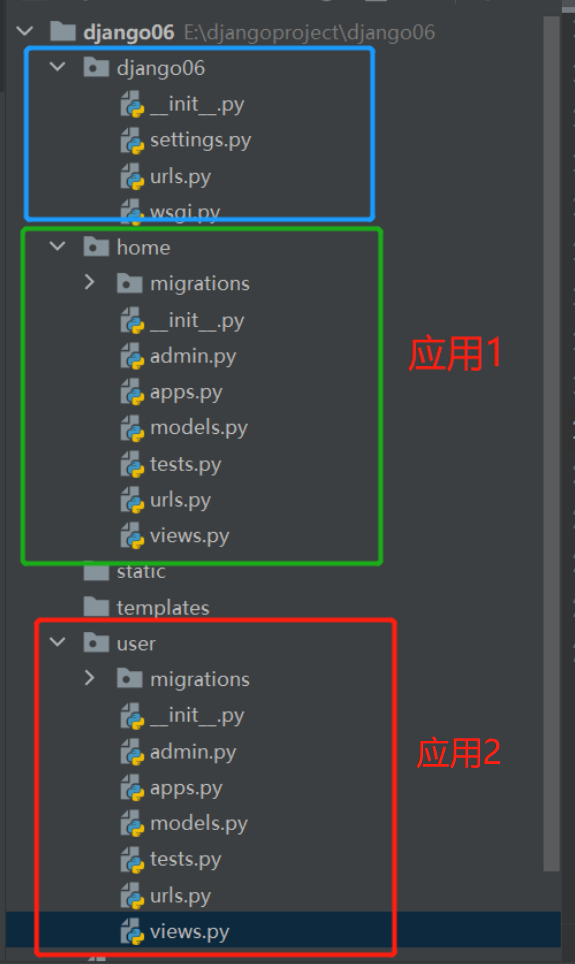 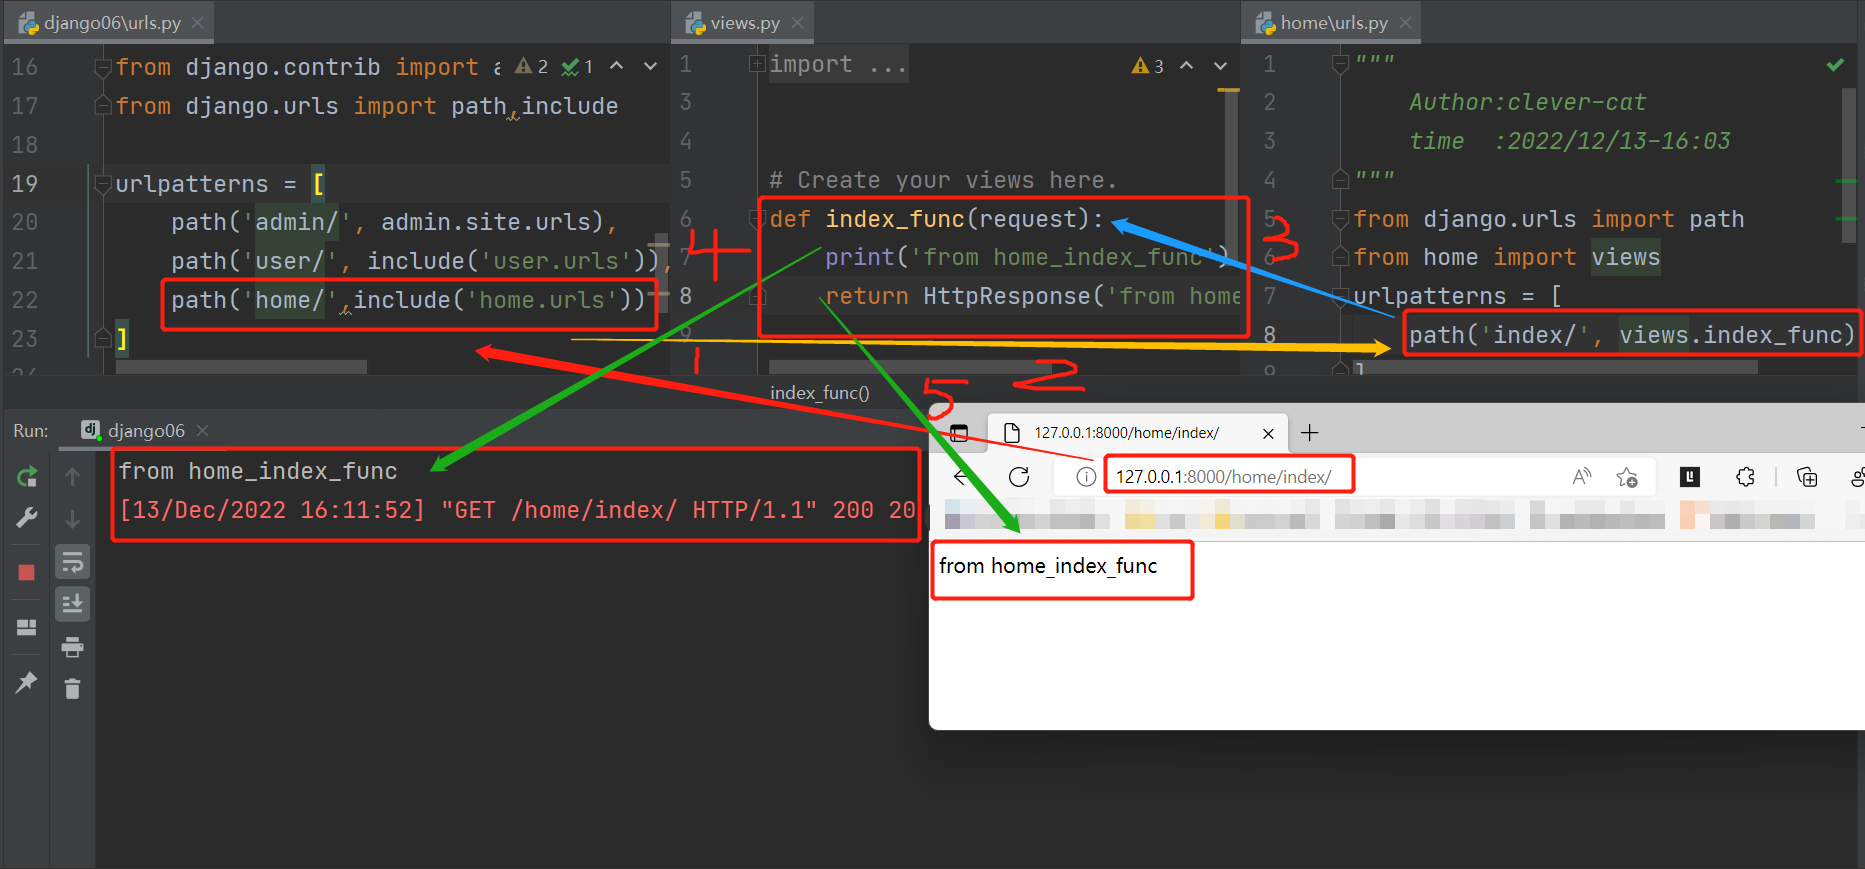 user同样也是这个流程 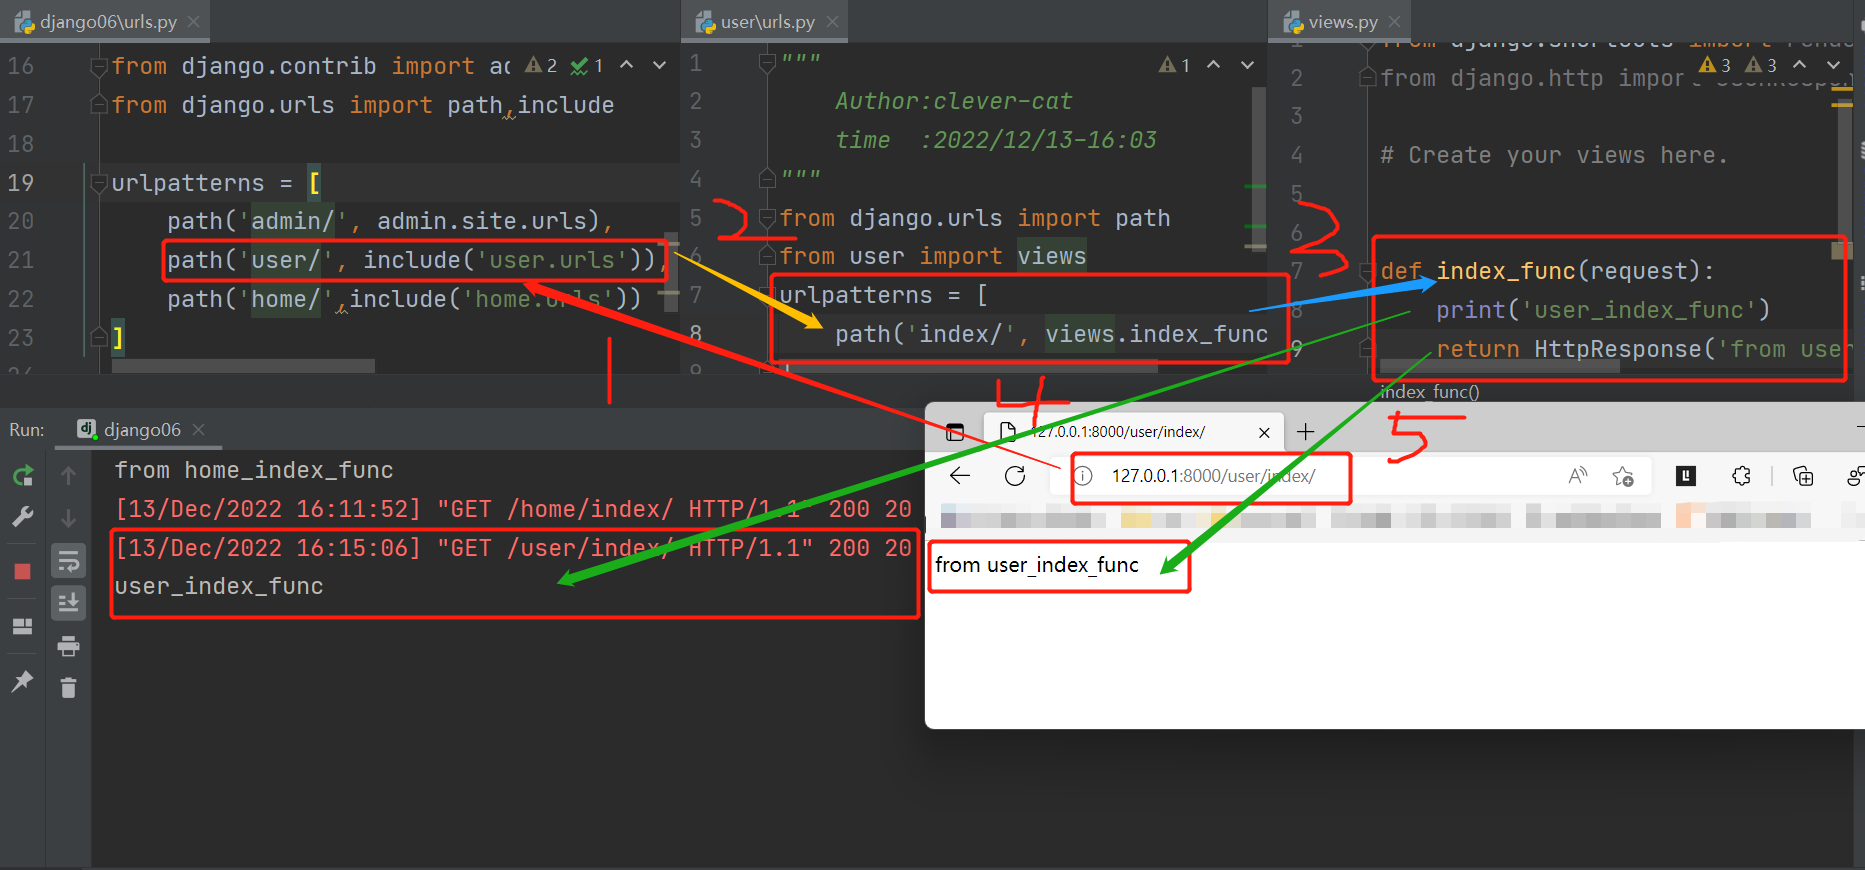 ## 名称空间 路由分发之后 针对相同的别名能否自动反向解析出不同的应用前缀 默认情况下是无法直接识别应用前缀的 例如下面情况 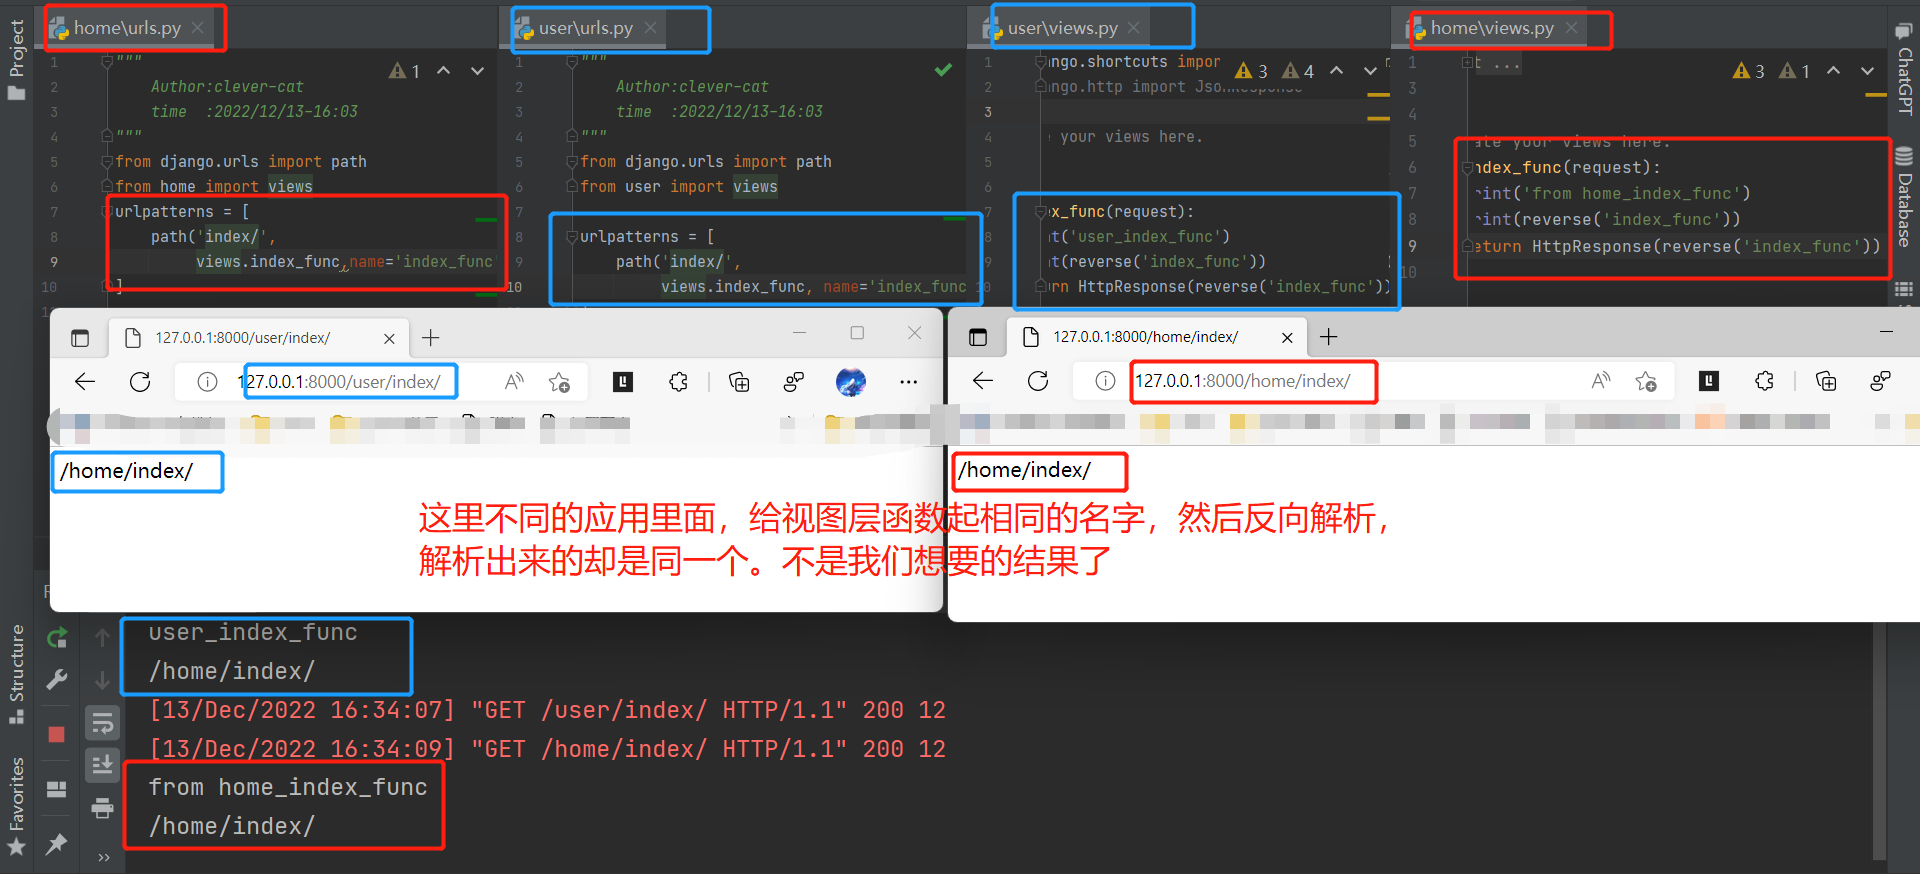 ```python path('user',include('user.urls'),name='index') path('home',include('home.urls'),name='index') ``` 如果想要正常识别区分有两种方式 1. 名称空间 总路由 ```python path('user/', include(('user.urls', 'user'), namespace='user')), path('home/', include(('home.urls', 'home'), namespace='home')), ``` 后端使用 ```python print(reverse('home:index_func')) print(reverse('user:index_func')) ``` 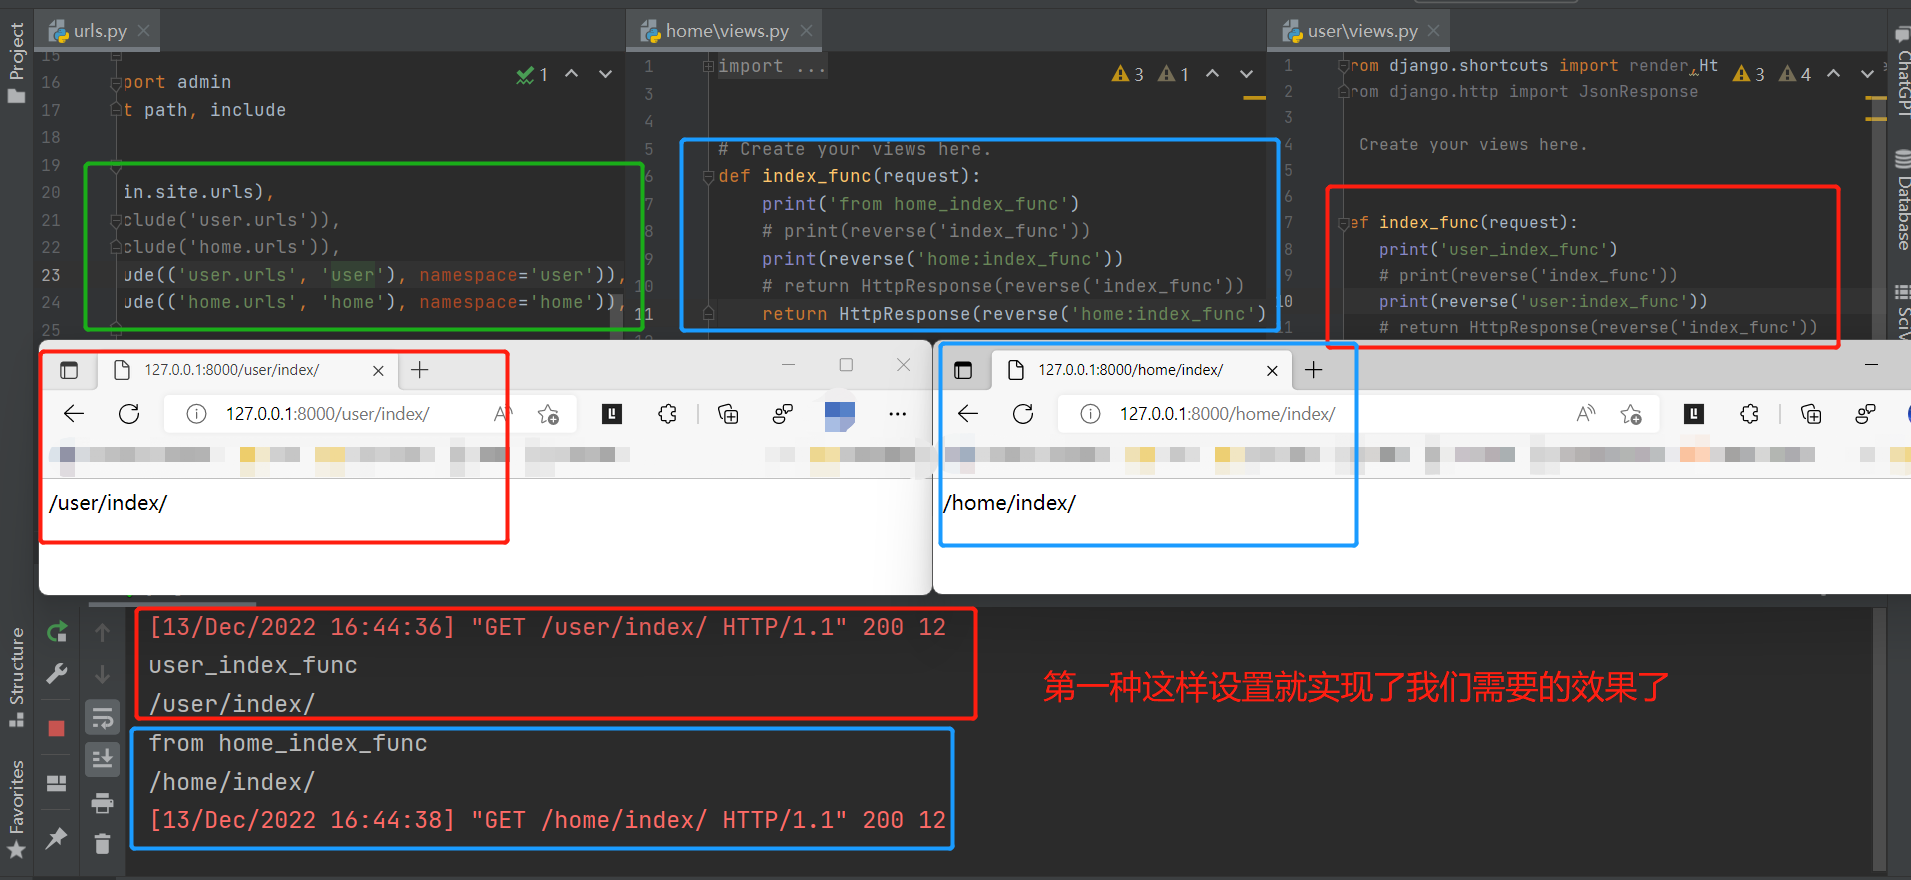 前端使用 ```python <h1 class="h1">{% url 'home:index_func' %}</h1> <h1 class="h1">{% url 'user:index_func' %}</h1> ``` 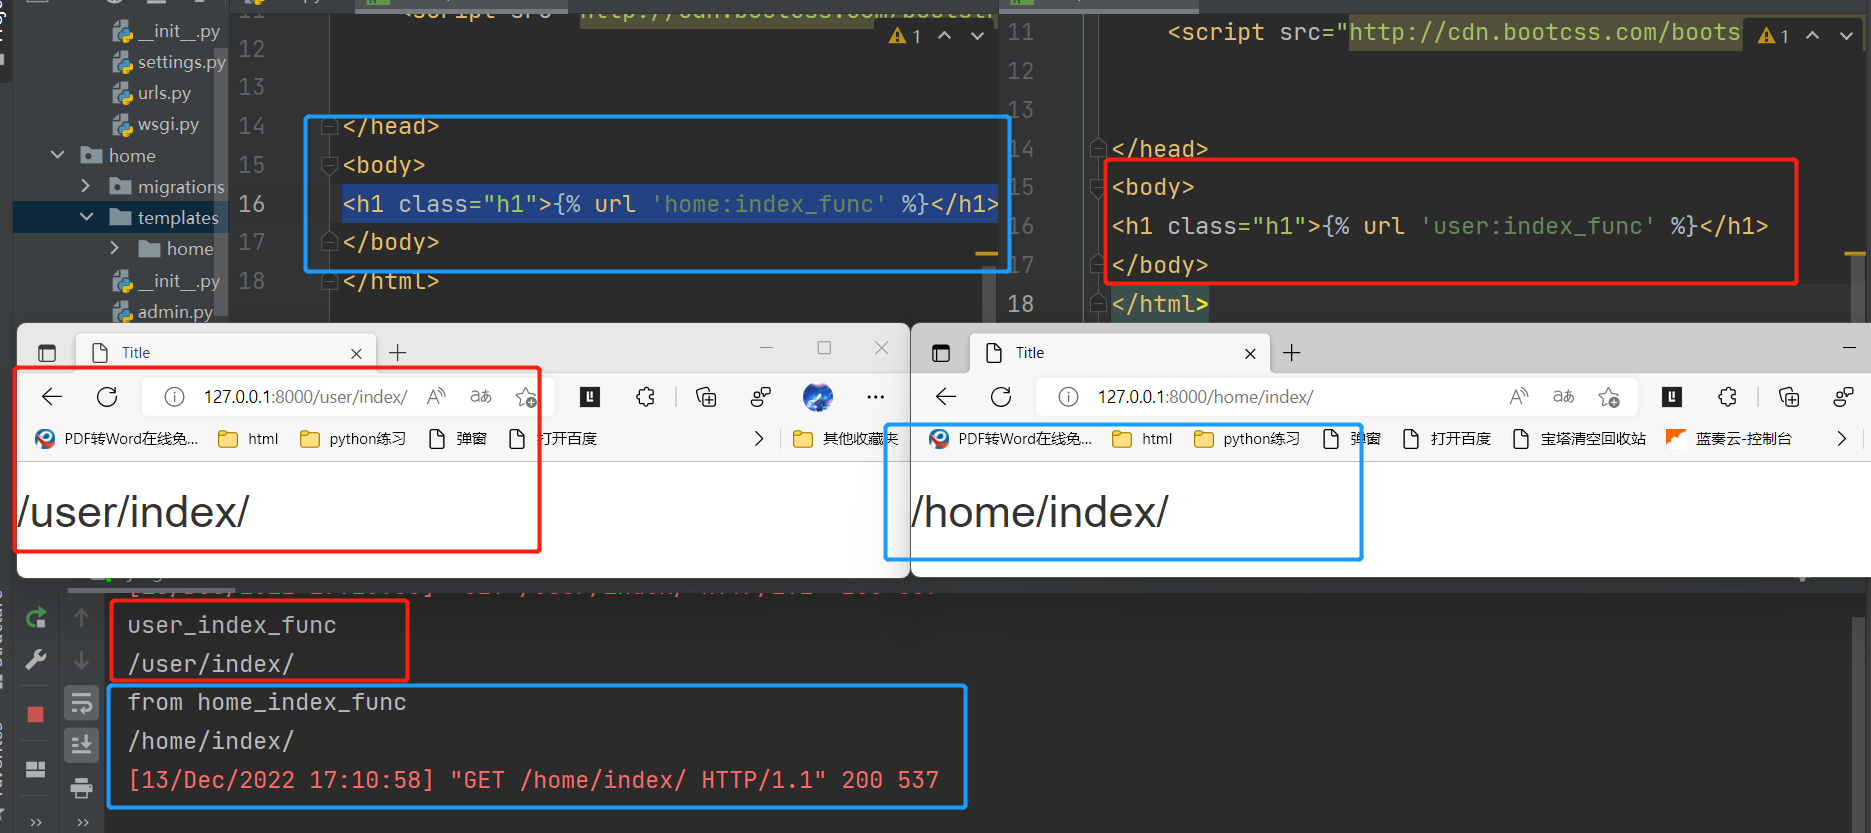 2. 别名不冲突即可(推荐使用这种,比较简单) 多个应用别名不冲突可以用应用名作为别名的前缀 后端使用 ```python #home.urls.py path('index/',views.index_func,name='home_index_func'), #user.urls.py path('index/', views.index_func, name='user_index_func'), ``` 前端使用 ```python <h1 class="h1">{% url 'home_index_func' %}</h1> <h1 class="h1">{% url 'user_index_func' %}</h1> ``` [关于两个不同应用,相同html文件冲突问题解决方法](https://www.cnblogs.com/clever-cat/p/16979348.html "关于两个不同应用,相同html文件冲突问题解决方法") ## 虚拟环境 项目1需要使用:django1.11 python(3.8版本) 项目2需要使用:django2.22 pymysql requests python(3.8版本) 项目3需要使用:django3.22 requests_html flask python(3.8版本) 实际开发项目中我们只会给项目配备所需的环境,不需要的一概不配!! 虚拟环境:能够针对相同版本的解释器创建多个分身 每个分身可以有自己独立的环境 方式一:pycharm创建虚拟环境:(每创建一个虚拟环境就相当于重新下载了一个权限的解释器) 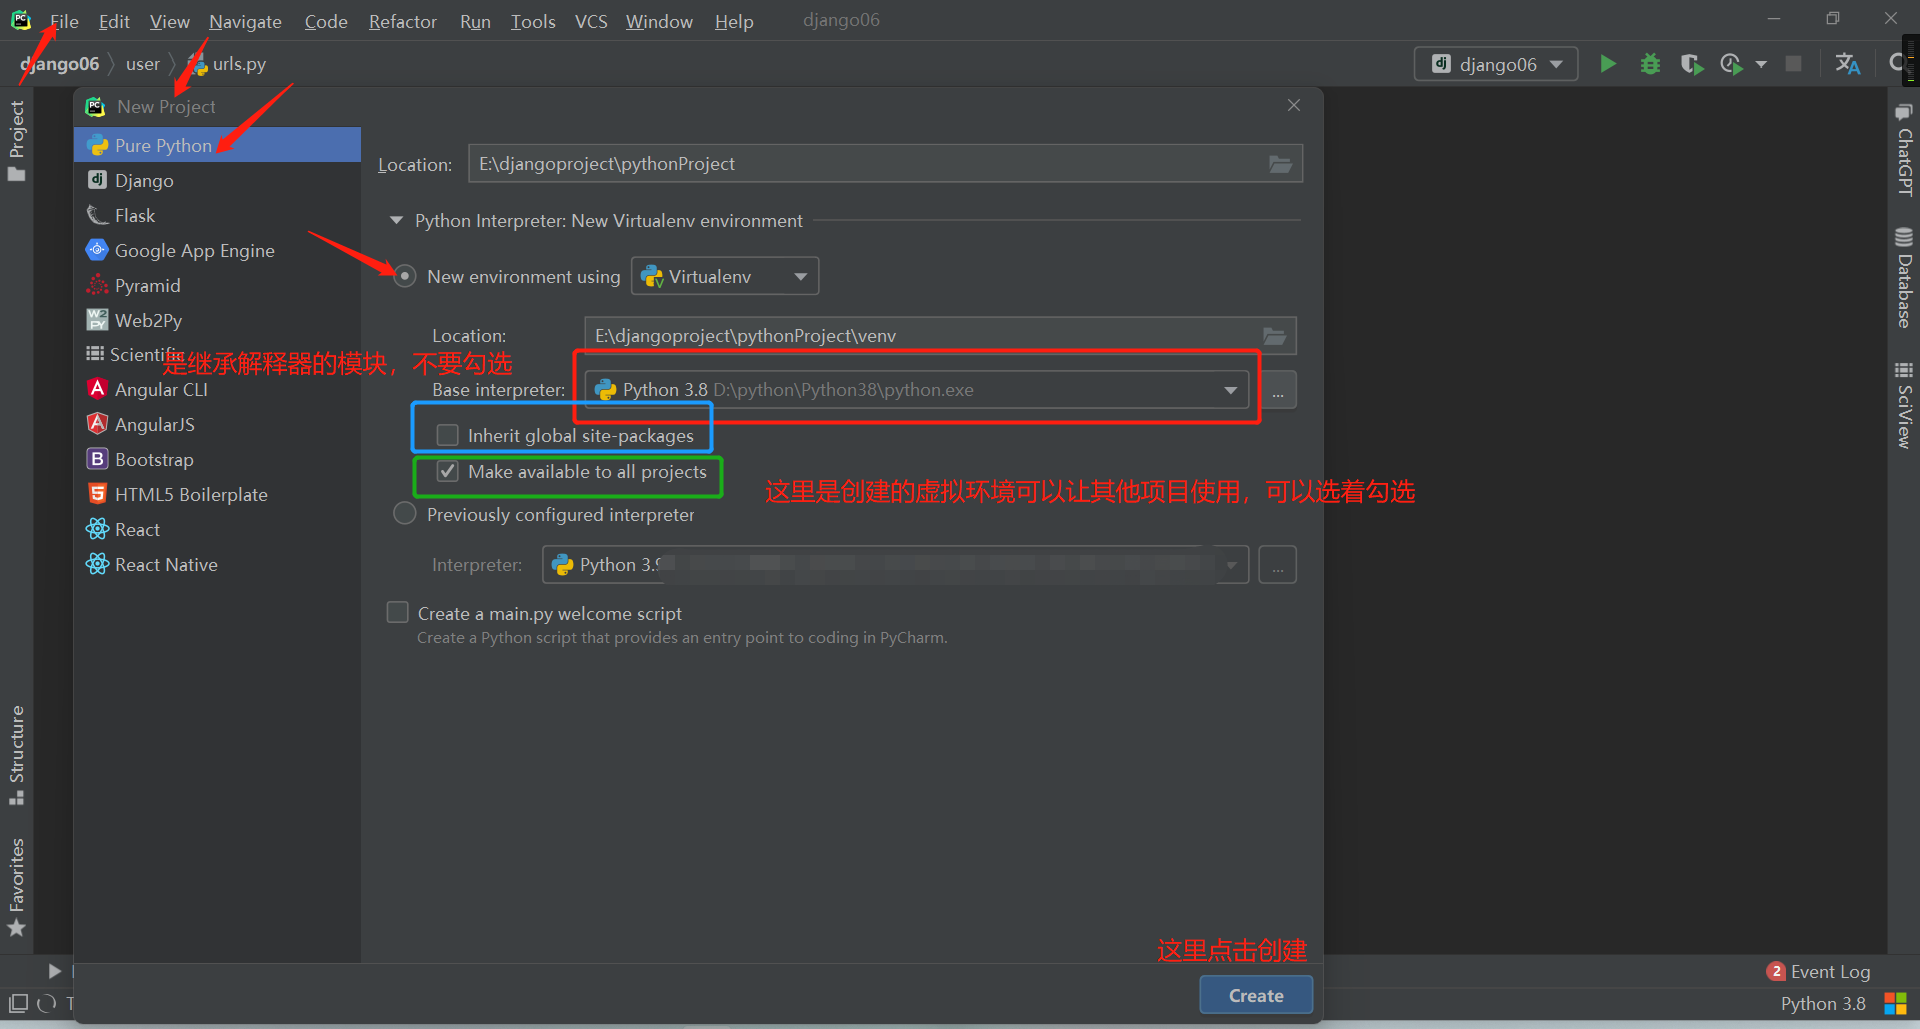 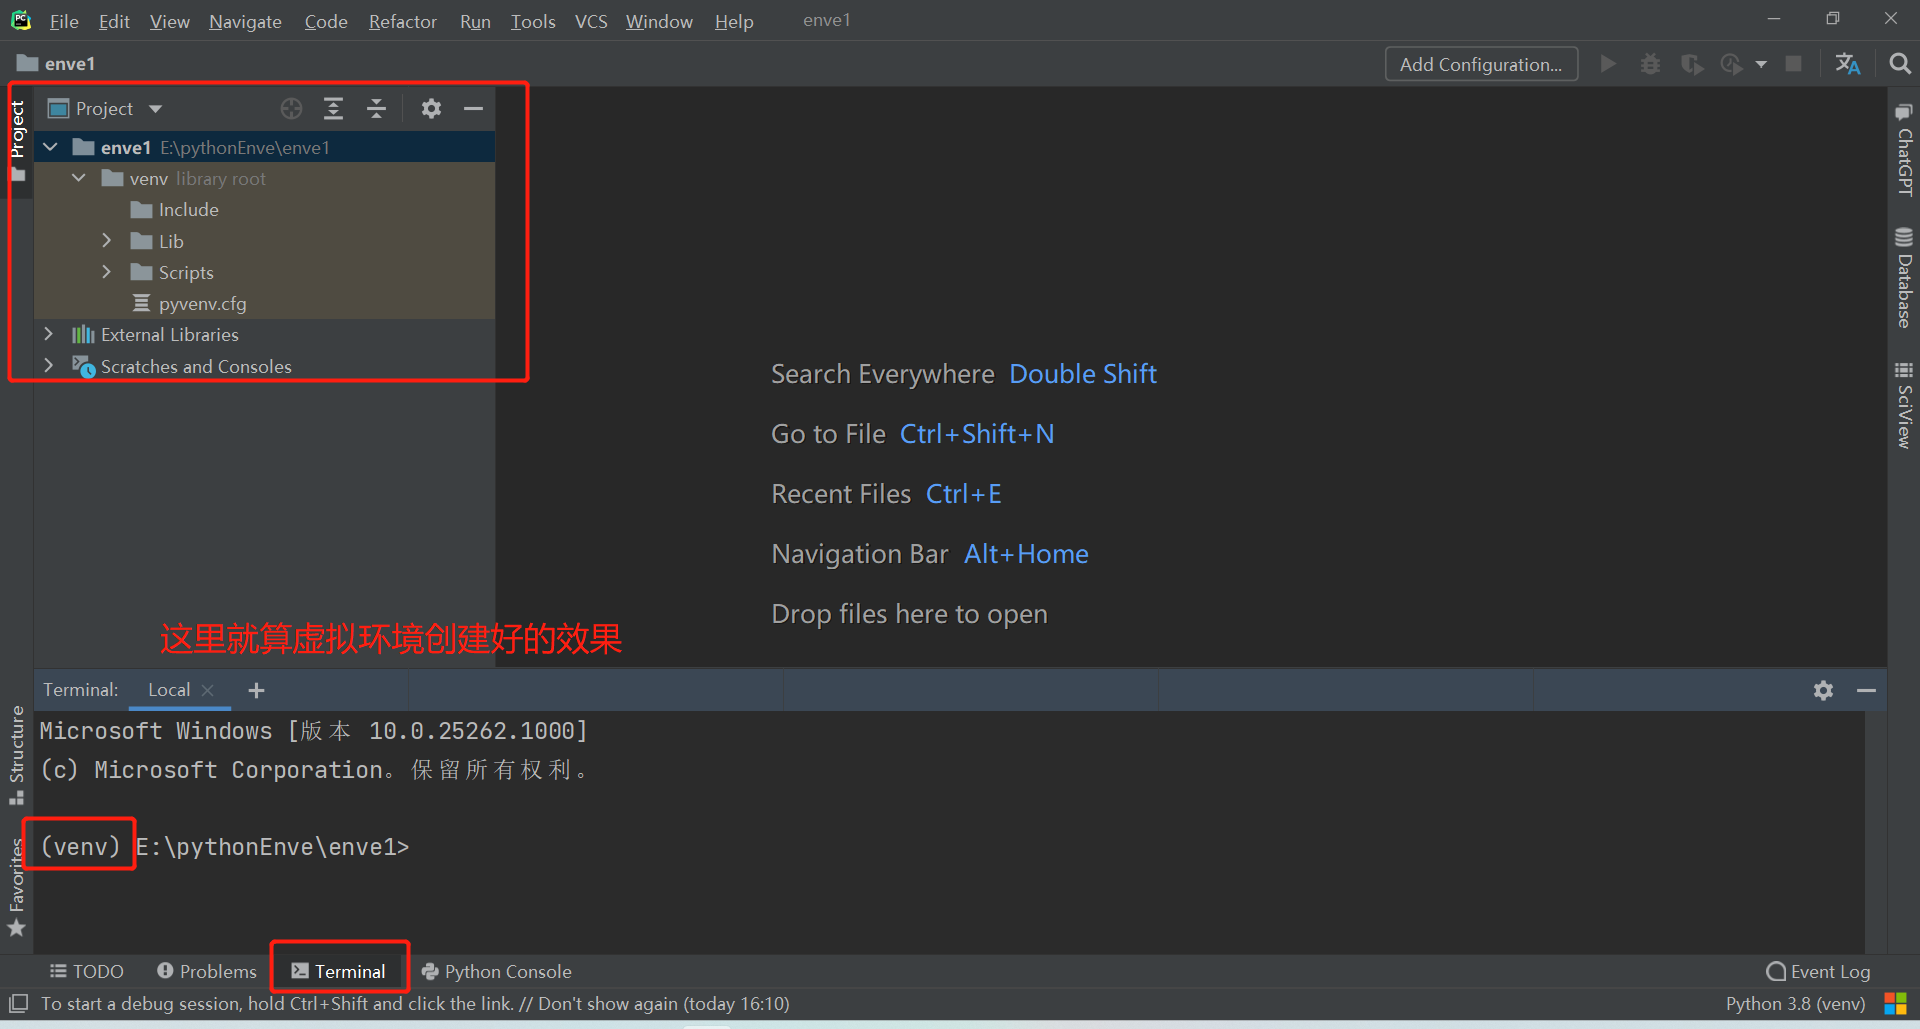 在创建虚拟环境缓慢,或者无法无法创建的时候,是因为虚拟环境会一些依赖,要从国外下载,比较慢,或者网络原因造成下载失败, 建议手动永久换源,具体步骤请看这里[pip模块永久换源 - clever-cat](https://www.cnblogs.com/clever-cat/p/16830131.html#下载第三方模块可能会出现的问题) 第二种方式 cmd终端配置 建议使用python3.8以上的版本因为自带了虚拟模块,3.8以下的需要安装模块 需要注意的是python命令此处不支持多版本共存的操作 python27 python36 python38, 如果使用会报以下错误 ```python python38 -m venv py38 ``` 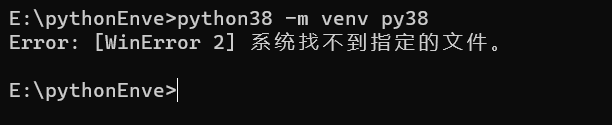 下面这样就创建成功了 ```python python -m venv py38 ``` 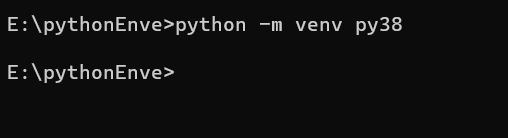 虚拟环境的激活与关闭 激活 首先要进入虚拟目录的Scripts目录中然后执行下面命令 ```python active ```  下面是激活后的效果   关闭 ```python deactive ```  安装模块 如果出现--trusted-host就使用下面命令 ```python pip install --index-url http://mirrors.aliyun.com/pypi/simple/ django==1.11.11 --trusted-host mirrors.aliyun.com ``` 正常情况直接就算下面这样直接安装成功 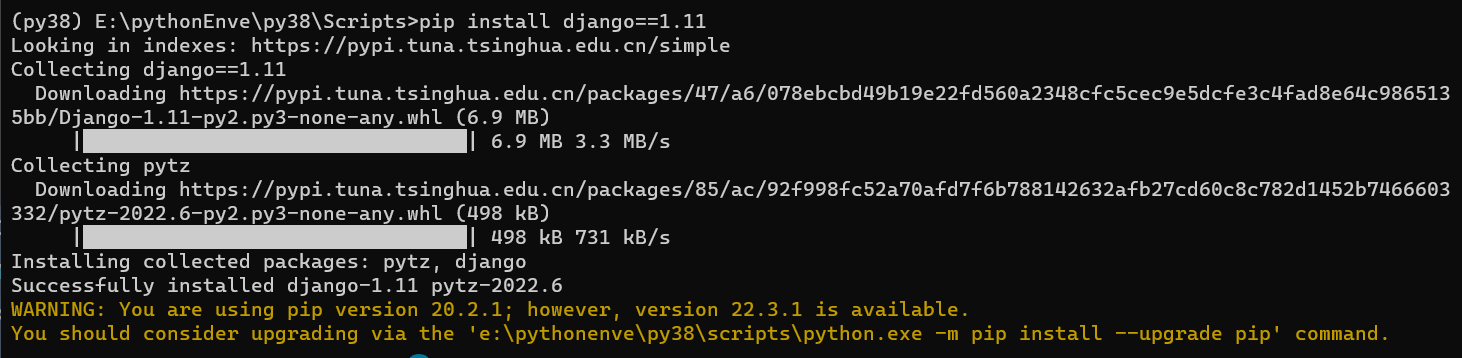 ## 视图层必会三板斧 用来处理请求的视图函数都必须返回HttpResponse对象 完全正确 HttpResponse ```python 底层 class HttpResponse(HttpResponseBase): pass 使用 def index_func(request): return HttpResponse('哈哈哈') ``` render ```python 底层 def render(request, template_name, context=None, content_type=None, status=None, using=None): content = loader.render_to_string(template_name, context, request, using=using) return HttpResponse(content, content_type, status) 所以render底层也是返回HttpResponse对象 使用 def index_func(request): return render(request, 'home/index.html') ``` redirect ```python 底层 def redirect(): redirect_class = 类(祖先有个类是HttpResponse) return redirect_class() 使用 def index_func(request): return redirect() ``` ## JsonResponse对象 ```python from django.shortcuts import HttpResponse def show_func(request): a1 = {'name': '张三', 'pwd': '123', 'age': 18} import json re_data = json.dumps(a1) # 取消转义 return HttpResponse(re_data) ``` 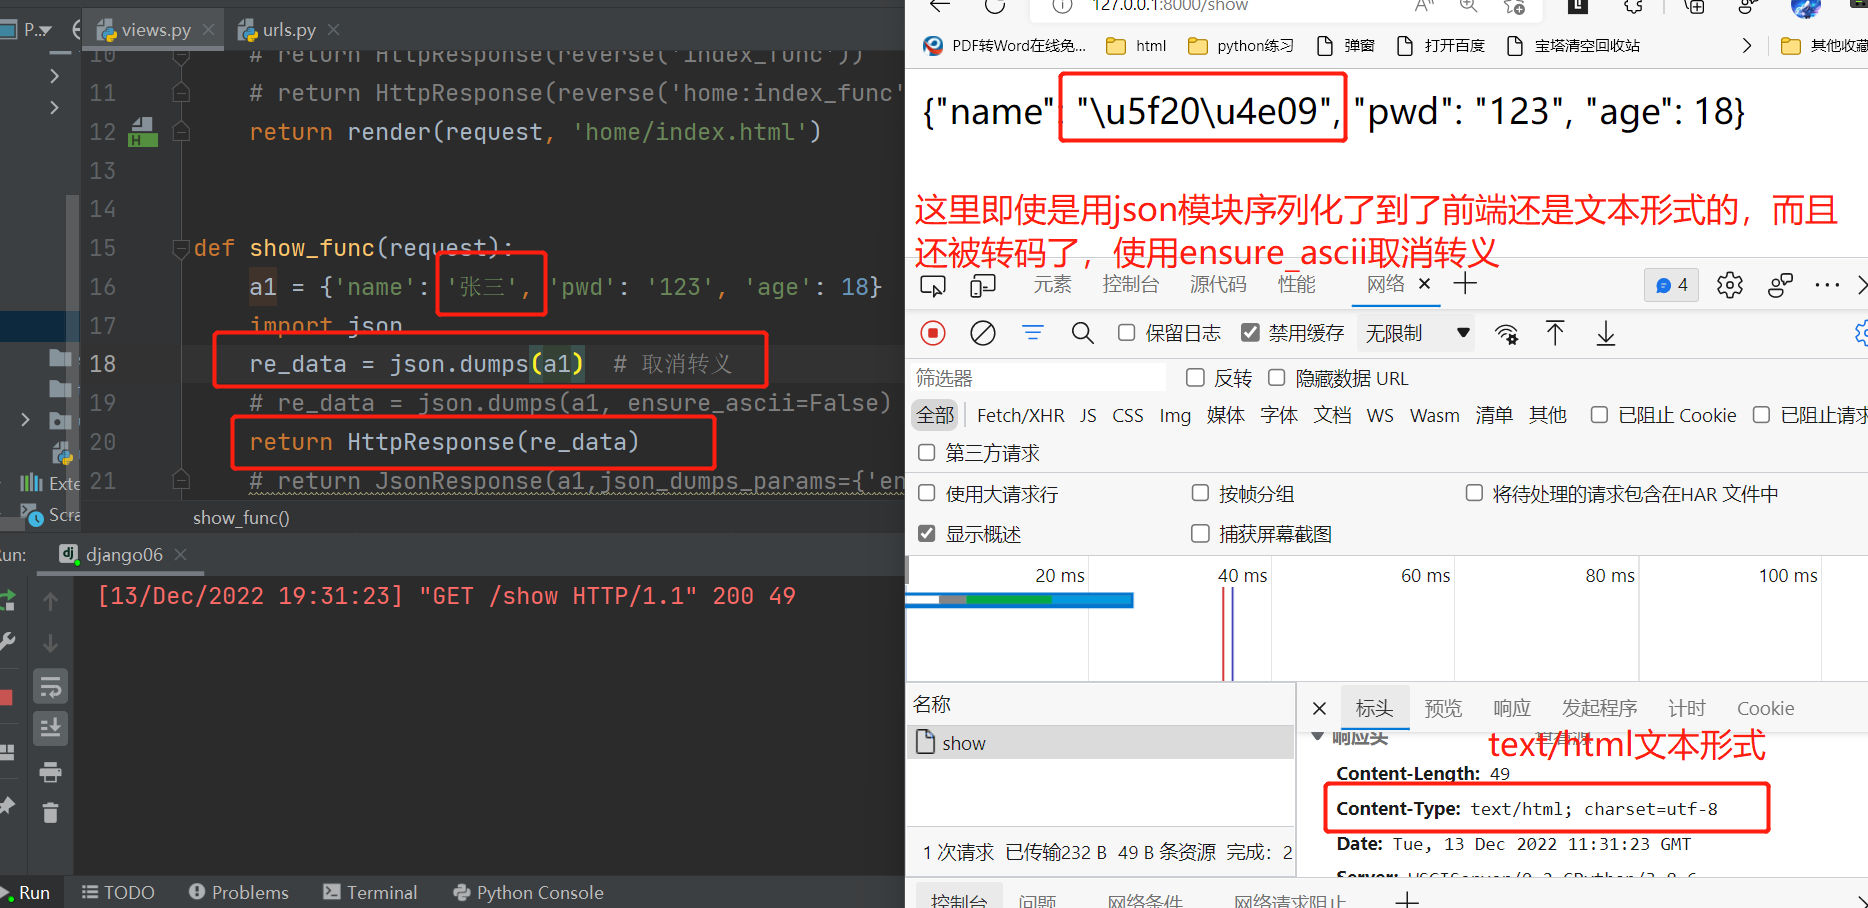 ```python from django.http import JsonResponse def show_func(request): a1 = {'name': '张三', 'pwd': '123', 'age': 18} # 返回给浏览器一个json格式的字符串 return JsonResponse(a1,json_dumps_params={'ensure_ascii':False}) ``` 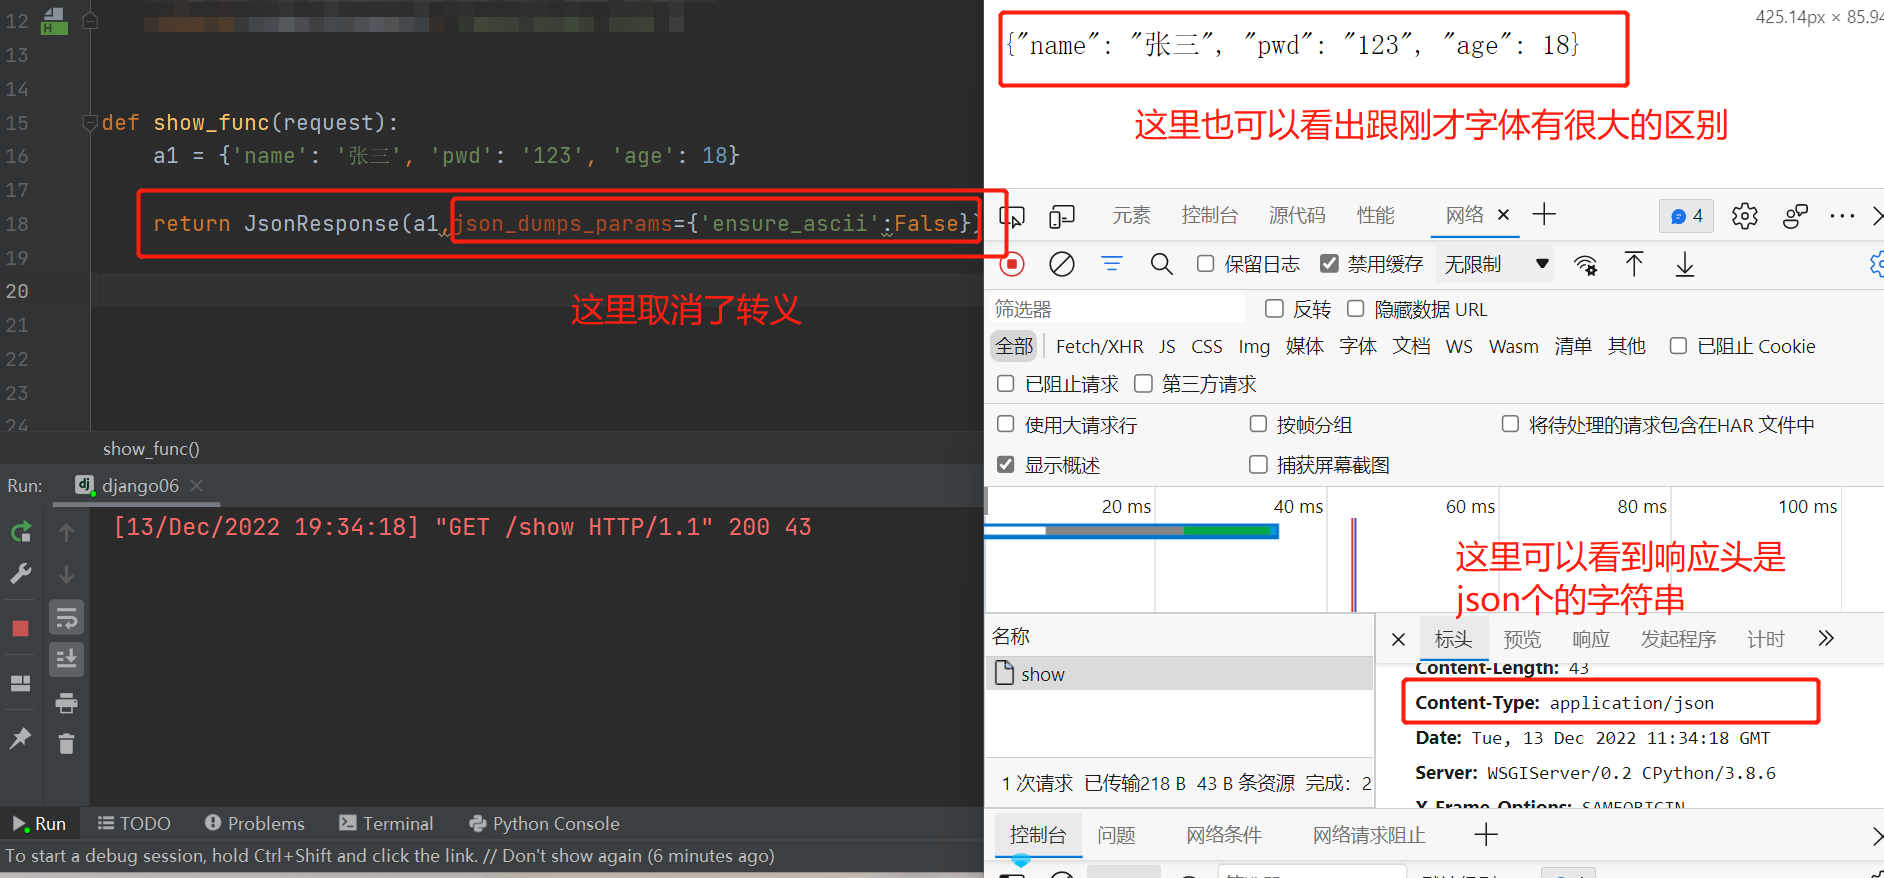 以后写代码很多时候可能需要产靠源码及所学知识扩展功能 ```python class JsonResponse(HttpResponse): """ An HTTP response class that consumes data to be serialized to JSON. :param data: Data to be dumped into json. By default only ``dict`` objects are allowed to be passed due to a security flaw before EcmaScript 5. See the ``safe`` parameter for more information. :param encoder: Should be a json encoder class. Defaults to ``django.core.serializers.json.DjangoJSONEncoder``. :param safe: Controls if only ``dict`` objects may be serialized. Defaults to ``True``. :param json_dumps_params: A dictionary of kwargs passed to json.dumps(). """ def __init__(self, data, encoder=DjangoJSONEncoder, safe=True, json_dumps_params=None, **kwargs): if safe and not isinstance(data, dict): raise TypeError( 'In order to allow non-dict objects to be serialized set the ' 'safe parameter to False.' ) if json_dumps_params is None: json_dumps_params = {} kwargs.setdefault('content_type', 'application/json') data = json.dumps(data, cls=encoder, **json_dumps_params) super().__init__(content=data, **kwargs) ``` 下面是json模块可以序列化的数据类型 ```python +-------------------+---------------+ | Python | JSON | +===================+===============+ | dict | object | +-------------------+---------------+ | list, tuple | array | +-------------------+---------------+ | str | string | +-------------------+---------------+ | int, float | number | +-------------------+---------------+ | True | true | +-------------------+---------------+ | False | false | +-------------------+---------------+ | None | null | +-------------------+---------------+ ``` 这里是djngo基于json模块又给我们加了一些封装的数据类型 ```python class DjangoJSONEncoder(json.JSONEncoder): """ JSONEncoder subclass that knows how to encode date/time, decimal types, and UUIDs. """ ``` JsonResponse主要序列化字典 怎对非字典的其他可以被序列化的数据需要修改safe参数为False ```python def show_func(request): l1 = [1, 2, 3, 4, 5, '哈哈', '123'] return JsonResponse(l1, json_dumps_params={'ensure_ascii': False}) ```  ```python def show_func(request): l1 = [1, 2, 3, 4, 5, '哈哈', '123'] return JsonResponse(l1, json_dumps_params={'ensure_ascii': False},safe=False) ``` 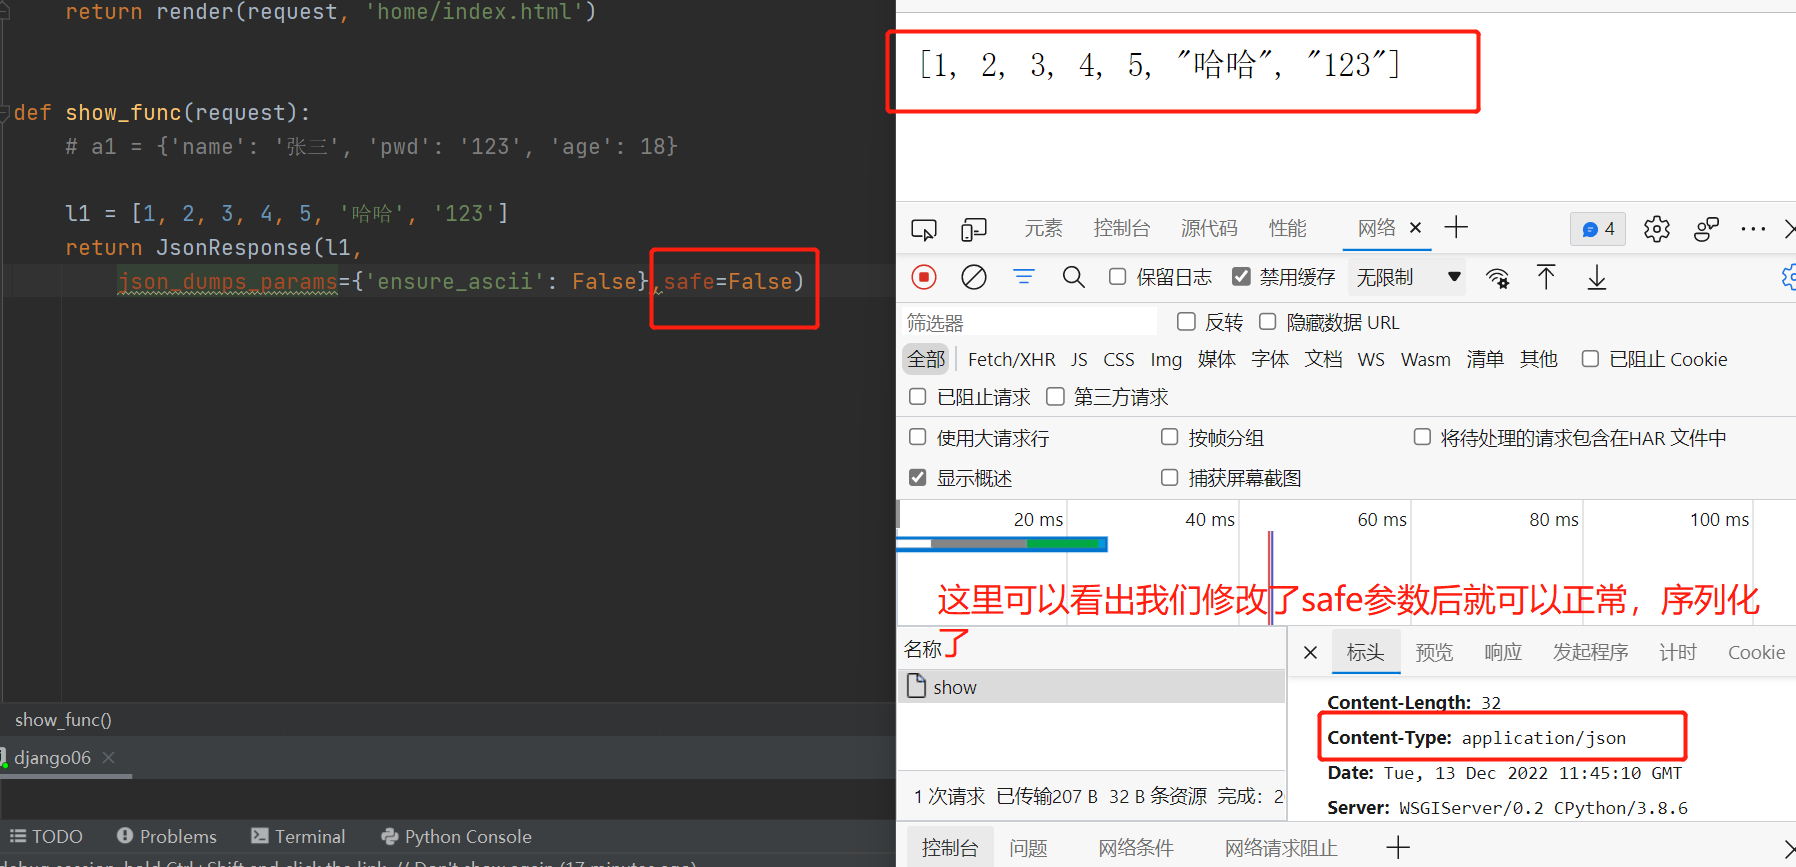 ## 视图层request对象获取文件 form表单携带文件类型的数据需要做到以下几点 1. method必须是post 2. `enctype`必须是`multipart/form-data` django后端需要通过request.FILES获取文件类型的数据 单文件上传 后端代码 ```python if request.method.lower() == 'post': res_obj = request.FILES.get('file') # 获取文件对象需要与前端 file name的属性值一致 print(res_obj.name) # 获取文件对象里面的文件名字 #保存文件 import os from django06 import settings with open(os.path.join(settings.BASE_DIR, 'home', 'templates', res_obj.name), 'wb') as f: for i in request.FILES.get('file'): f.write(i) ``` 前端代码 ```python <form action="" method="post" enctype="multipart/form-data"> {% csrf_token %} <input type="file" name="file"> <button>btuuon上传</button> <input type="submit" value="submit上传"> </form> ``` 多文件上传 后端代码 ```python if request.method.lower() == 'post': res_obj = request.FILES.getlist('file') for file_obj in res_obj: print(file_obj.name) import os with open(os.path.join(settings.BASE_DIR, 'home', 'templates', file_obj.name), 'wb') as f: for i in file_obj: f.write(i) ``` 前端代码 ```python <form action="" method="post" enctype="multipart/form-data"> {% csrf_token %} <input type="file" name="file" mutiple> <button>btuuon上传</button> <input type="submit" value="submit上传"> </form> ```  上传成功 ## 视图层FBV与CBV FBV 基本函数的视图 ```python def index(request):return HttpResponse对象 ``` CBV 基于类的视图 ```python from django import views class Myfunc(views.View): def get(self, request): return HttpResponse('from CBV get function') def post(self, request): return HttpResponse('from CBV post function') path('view/', views.MyView.as_view()) ``` 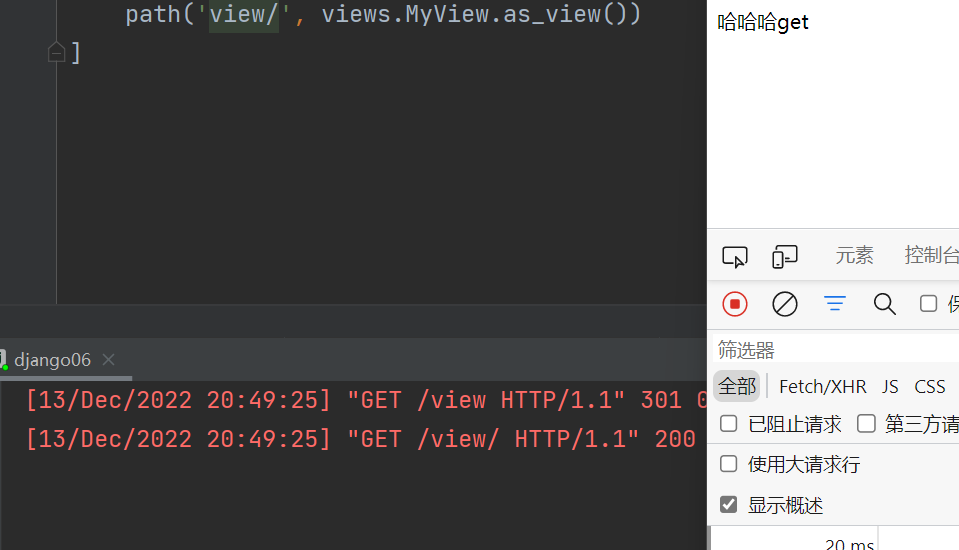 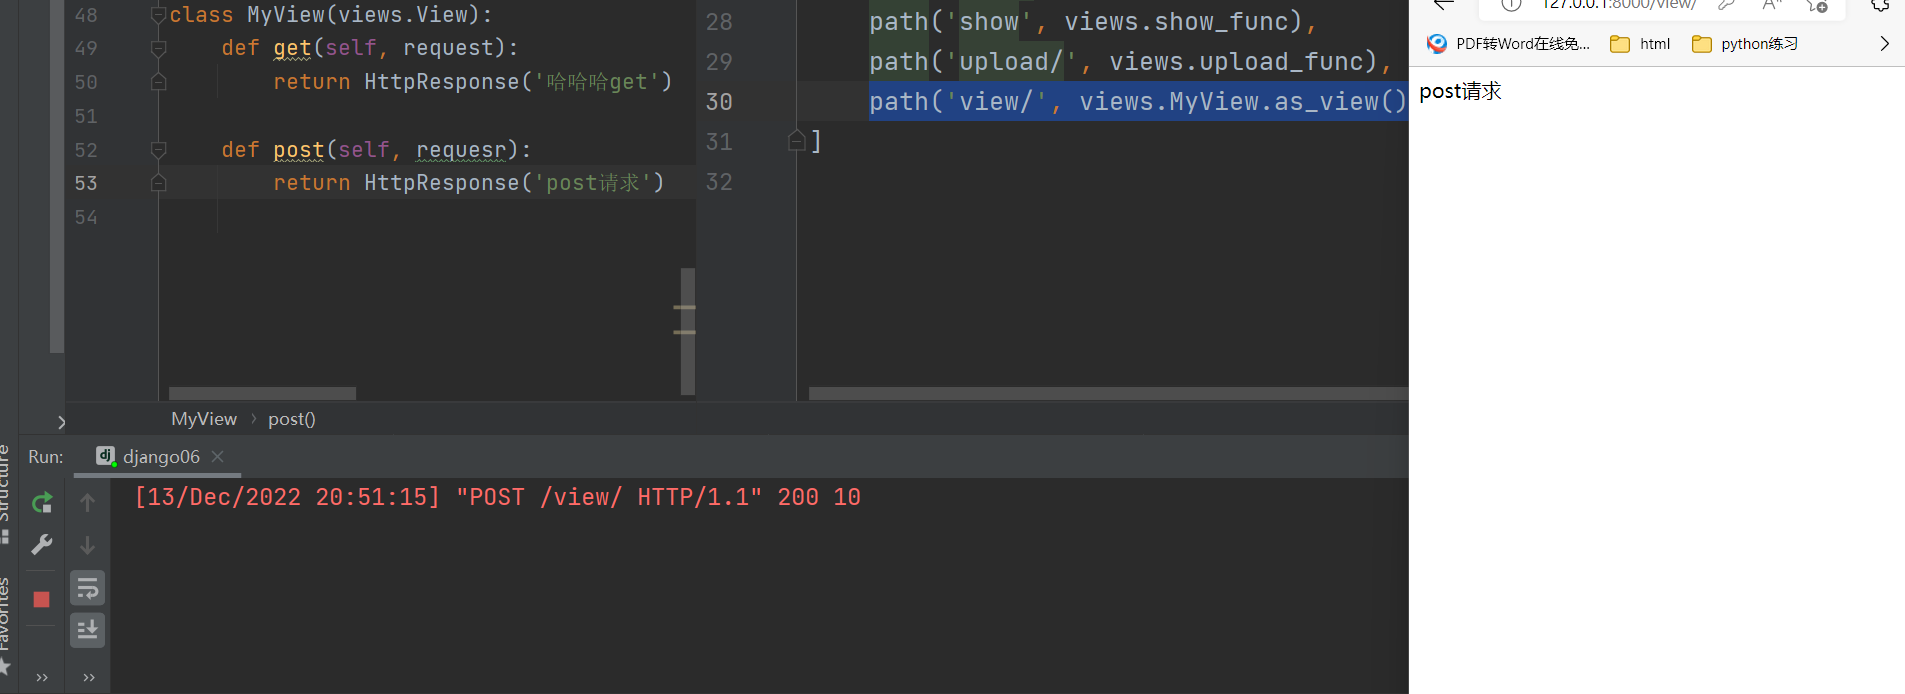 ## CBV源码剖析(重点) 1. 切入点CBV的路由匹配切入 ```python path('view/', views.MyView.as_view()) ``` 1. 类点点名字(名字查找顺序问题) 2. 类名点名字并且加括号调用不穿参数(静态方法,绑定给类的方法) 2. 函数名加括号执行优先级最高项目一启动就会自动执行as_view方法 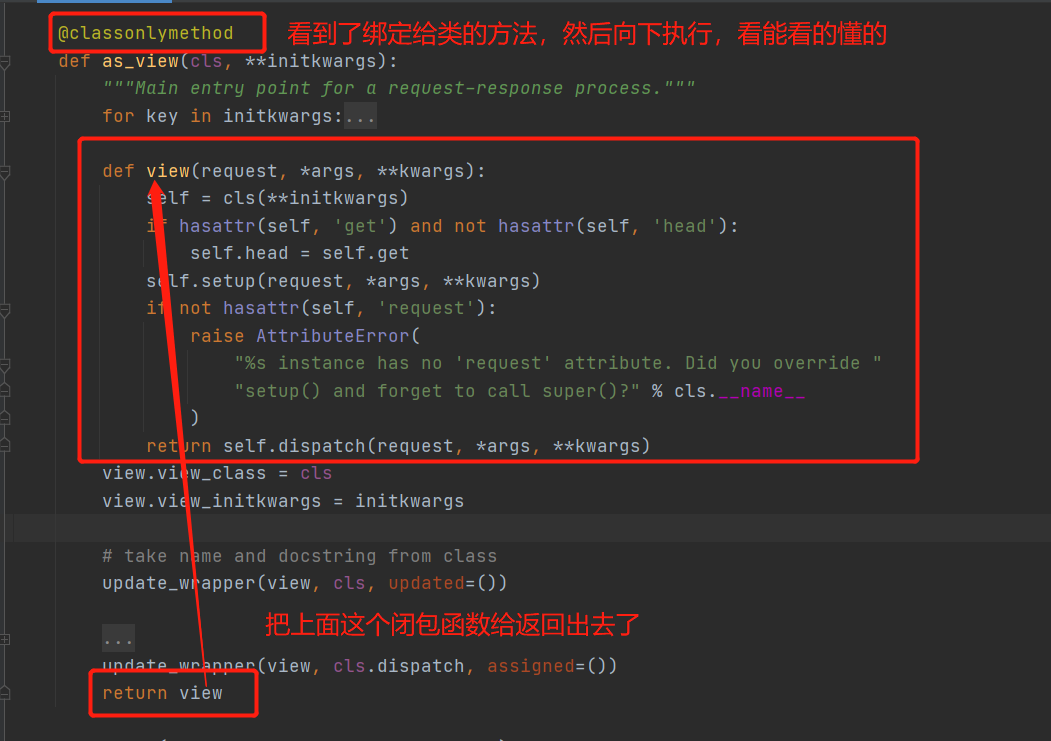 然后就变成了下面的形式 ```python path('login/', views.view) # CBV路由本质还是,FBV ``` 3. 我们在地址栏访问view路由匹配成功会自动加括号views.view函数 1. 产生我们自己编写类的对象 2. 对象调用dispatch方法(注意查找顺序) 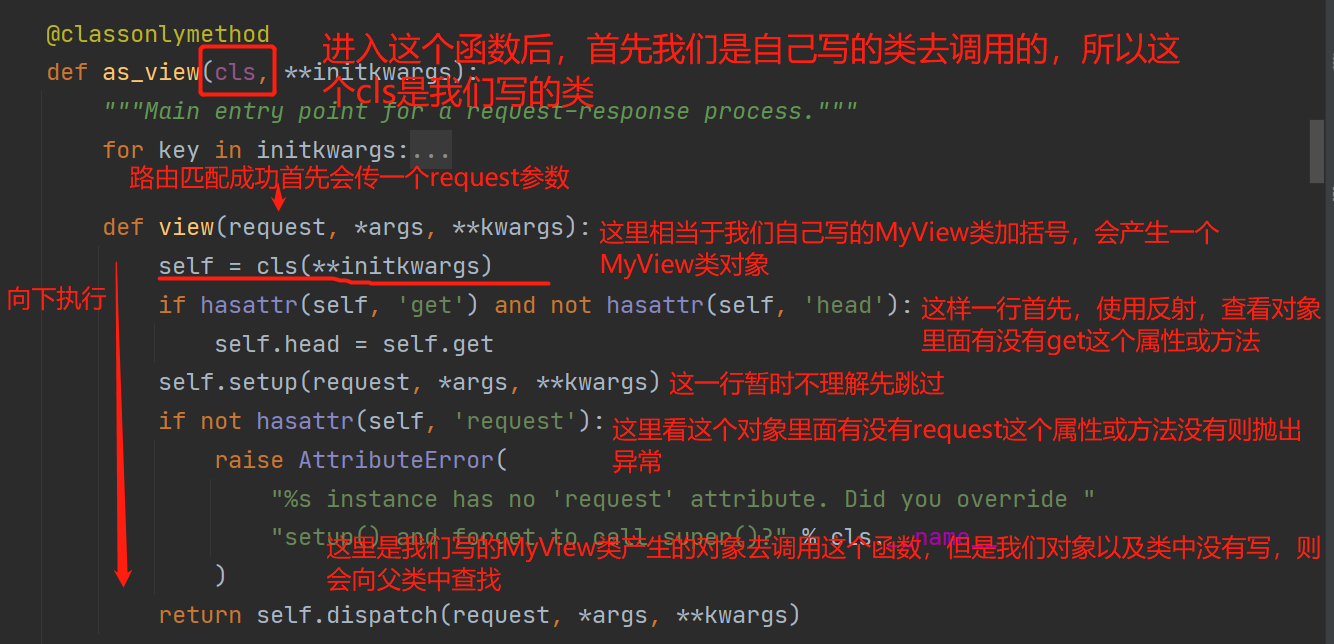 4. 研究父类中的dispatch方法 获取当前请求方法并转小写 之后利用反射获取类中的对应的方法并执行 ```python class View: @classmethod def as_view(cls, **initkwargs): def view(request, *args, **kwargs): self = cls(**initkwargs) return self.dispatch(request, *args, **kwargs) def dispatch(self, request, *args, **kwargs): handler = getattr(self, request.method.lower()) return handler(request, *args, **kwargs) ``` 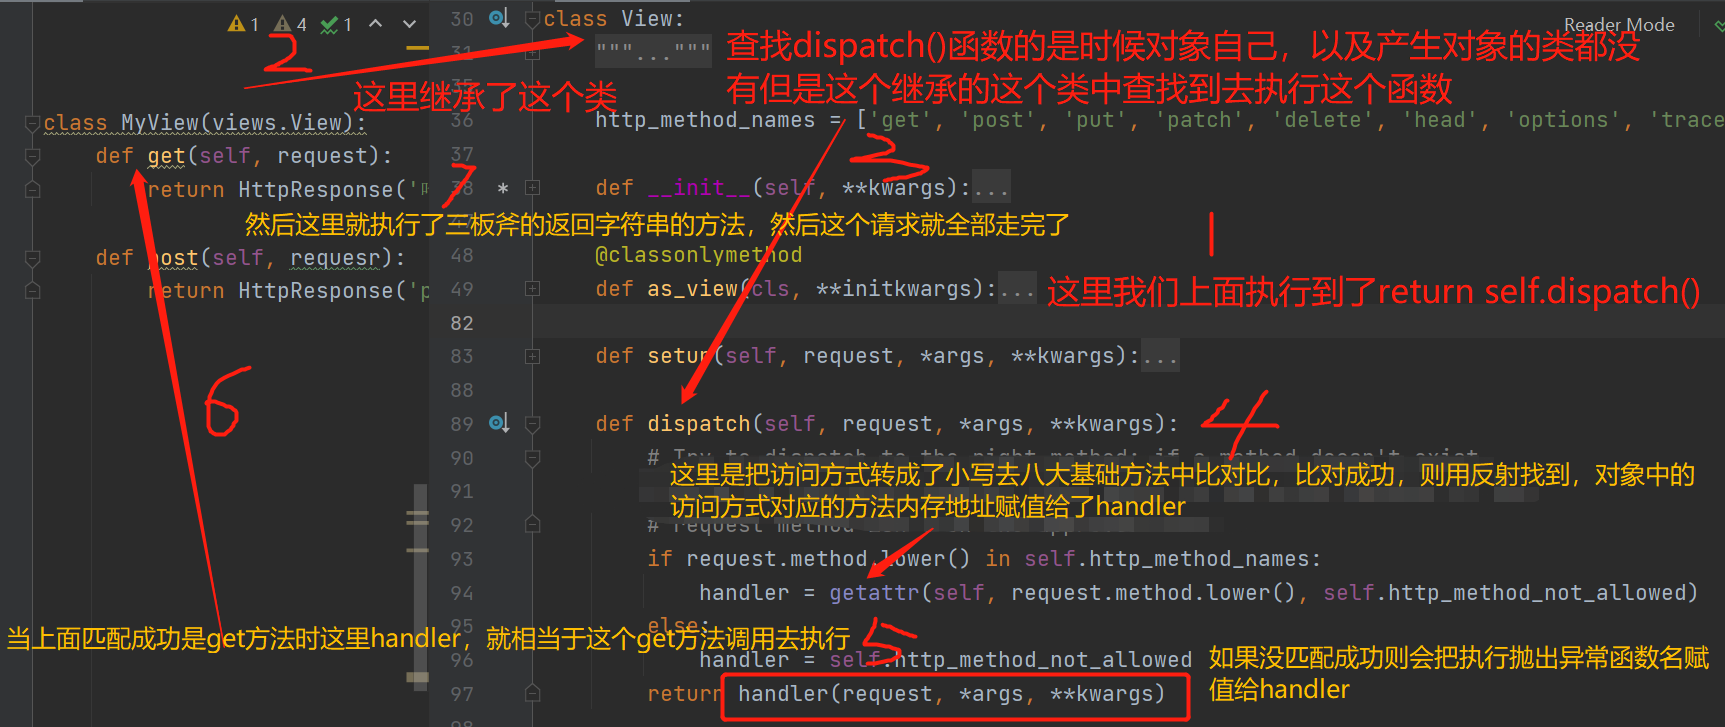 Last modification:December 17th, 2022 at 03:46 pm © 允许规范转载 Support 如果觉得我的文章对你有用,请随意赞赏 ×Close Appreciate the author Sweeping payments
Comment here is closed